

How I edit my photos
- Jacob Tran

- May 5, 2019
- 3 min read

Over the past few months I have been revamping my editing style. I have received a ton of questions on how I edit my photos. I feel like photo editing is unique to the photographer’s eye because it is what they want their final photograph to look like. However, seeing how other people edit photos does help gain some insight in learning color theory and also how to use the software. So today I’m sharing some tips and tricks to editing your photos in Lightroom.
A little over 5 years I have been using Lightroom and shout out to my dad for showing me how to use the basics of Lightroom and it was a realm that was more reliable than just editing my photos on VSCO. I always thought that you had to go to school to learn how to edit photos like a professional photographer. But for the most part Lightroom has an easy interface to use that you could get photos of that caliber.
WHY LIGHTROOM?
First and foremost, all the pros use Lightroom. It’s by far one of the most powerful tools to edit your photos. You have the ability to custom create presets or buy presets to create the intended effects you want. The best part? You can do this in just one click. I know that Lightroom has saved me countless hours.
So many people ask how I edit my photos. It’s actually become one of my favorite things to do because Lightroom makes the editing process so straightforward. My pictures look better yet take me less time. I can edit 50 photos in one click. And I’m able to filter through what works best for my photos. In short, it’s been life changing for my blog and photography to use Lightroom and I recommend it to EVERYONE.
Lastly, whenever I find photos I like, I ask what people use to edit and the answer is ALWAYS Lightroom. I developed my own presets (think of presets in Lightroom as custom filters that work magic on your photos) that make my editing process seamless.
WHAT YOU NEED
I suggest getting Lightroom and Photoshop together. It actually ends up being cheaper that way. I do use Photoshop to create text overlays and create graphics, like the one above! You’ll spend just under $10 a month and this is one of my most important investments in my blog. To me, being able to quickly and beautifully edit my photos is totally worth it.
CAMERAS AND SHOOTING MODE
First up, let’s talk cameras. Many people think you need a fancy camera in order to edit your photos in Lightroom. But that’s not true! You can edit photos from your smartphone or your camera. I personally use a Sony a6500 with a 30mm f1.4 sigma lens. The fact is, cameras are expensive and you want to get one that suits your needs. For years, I actually used a an older DSLR camera. Many people talk about the benefits of expensive cameras but I think you can still create beautiful images with simple technology.
With the internet being such a visual place, having beautiful photography will help your blog stand out in the crowd. Better photos also get shared and re-pinned more which will in turn drive more traffic to your site. So, basically what I’m saying is that photography can be a huge asset in growing your site, so it’s worth taking the time to practice and hone your skills.
Now for editing! I always start by moving my images from my SD card into a folder on my desktop. Then I drag those into Lightroom from there. That way I have the original copy in case I mess up or delete something. When you drag images into Lightroom it will give you the option to either Copy or Add them to Lightroom. ALWAYS choose Add! This just temporarily puts them into Lightroom. Copying them makes a second copy of that huge file and adds it to Lightroom and over time this can cause Lightroom to run very slow.


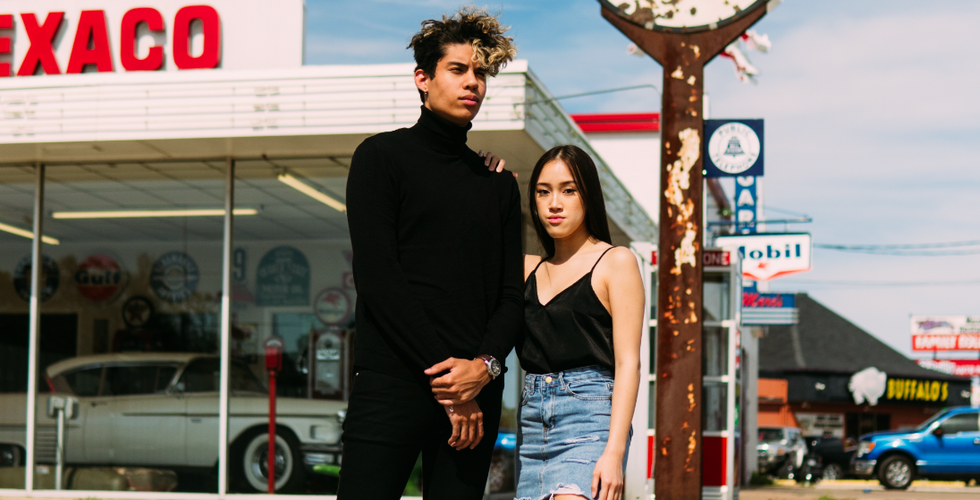
BEFORE AFTER
How To Edit in Lightroom
Once your images are imported, you can see them in the Library and edit them under the Develop panel. So open the Develop tab and select an image.
1. EXPOSURE: I bumped up the exposure a little bit and modified the highlights, shadows, whites and blacks. I focused on trying to make the blacks as down as possible.


2. TONE CURVE: I try to give the tone curve a standard "S-curve" to make the highlights and shadows pop a little


3. HUE, SATURATION, & LUMINANCE: Here are the adjustments I made to give the color this look

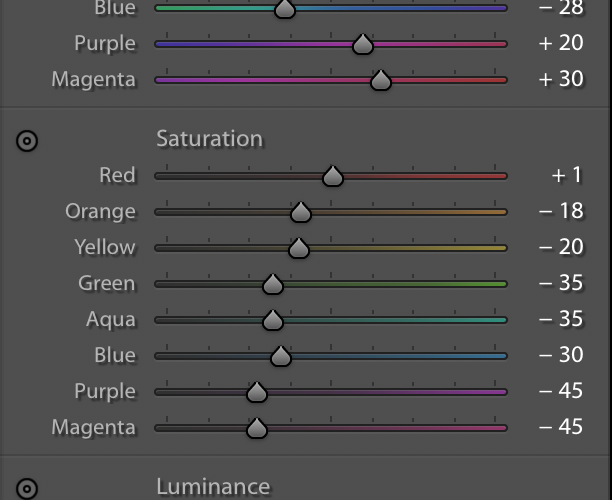


4. CALIBRATION: So here I made the Red Primary more orange, the Green Primary more blue and the Blue Primary more teal. This calibration is what makes the gives its vibrancy


Comentários